Getting Started with Yii2: A Step-by-Step Guide to Building Your First Application.
Learn How to Install XAMPP, Configure Composer, and Set Up Your First Yii2 Project with Ease.
Hi there 👋,
Welcome back to another exciting dive into the world of web development. Today, we’re embarking on a journey with one of PHP’s most robust frameworks — Yii. 🚀
📑 In this article, we’ll guide you step-by-step through setting up your first Yii2 application, from installing XAMPP to configuring Composer and running your project. Ready to kickstart your development with Yii2 and build powerful web applications? Let’s get started! 🎉
Yii is a high-performance, component-based PHP framework that simplifies the development of modern web applications. It stands for “Yes It Is,” signifying that it is a fast, secure, and efficient framework that can handle complex and large-scale applications with ease. Yii is designed with simplicity and scalability in mind, making it a great choice for both beginners and experienced developers.
Why ‘Yii’ is better than other PHP frameworks?
High Performance
Yii is optimized for performance right out of the box. It’s one of the fastest PHP frameworks available, thanks to its efficient core and caching mechanisms. Yii’s lazy loading technique ensures that resources are only loaded when needed, reducing overhead and speeding up the execution of your applications.
Built-In Security Features
Yii places a strong emphasis on security, providing a range of built-in features that protect your application from common web vulnerabilities:
- Cross-Site Request Forgery (CSRF) Protection: Yii includes CSRF validation tokens in forms, ensuring that requests come from authenticated users.
- SQL Injection Prevention: Yii uses parameterized queries in its ActiveRecord and Query Builder, protecting your application from SQL injection attacks.
- Password Hashing: Yii provides built-in functions for secure password hashing and verification.
MVC Architecture
Yii adheres to the Model-View-Controller (MVC) design pattern, promoting a clear separation of concerns. This architecture helps developers organize their code logically and maintainable:
- Model: Manages the data and business logic.
- View: Handles the presentation layer, generating the user interface.
- Controller: Acts as an intermediary between the model and view, processing user input and updating the model or view accordingly.
Gii Code Generator
Gii is Yii’s powerful code generation tool that can generate models, controllers, forms, modules, and more with just a few clicks. This feature dramatically speeds up the development process by providing a solid foundation upon which developers can build.

Yii is an incredibly versatile framework, capable of powering a wide range of applications, from small personal projects to large enterprise-level systems.
- Content Management Systems
- E-commerce Platforms
- RESTful APIs
- Portals and Forums
- Enterprise Level Social Networking Sites
Let’s Build the App 🎉
First, let’s set up the PHP environment
1. Prerequisites
Before diving into the installation process, list the prerequisites:
- Basic knowledge of PHP and object-oriented programming.
- Familiarity with the command line interface.
- A computer running Windows. (I am using Windows in this tutorial, but you can use any operating system like Mac or Linux)
2. Download and Install XAMPP
XAMPP is a free and open-source cross-platform web server solution stack package that includes Apache, MySQL (or MariaDB), PHP, and Perl. Here’s how to install it:
Step 1: Download XAMPP
- Visit the XAMPP official website.
- Choose the version compatible with your operating system (Windows, macOS, or Linux).
- Download the installer.
Step 2: Install XAMPP
- Run the installer and follow the setup instructions.
- Choose the components you want to install (Apache, MySQL, PHP, phpMyAdmin).
- Choose the installation directory (default is usually fine).
- Complete the installation and launch the XAMPP Control Panel.
Step 3: Start XAMPP
- Open the XAMPP Control Panel.
- Start Apache and MySQL services. You should see green indicators confirming that they are running.
- Verify the installation by opening a web browser and navigating to
http://localhost/. You should see the XAMPP welcome page.
3. Download and Install PHP Composer
Composer is a dependency manager for PHP, essential for installing Yii2 and managing its dependencies.
Step 1: Download Composer
- Visit the Composer download page.
- Download the Composer-Setup.exe file for Windows.
- For macOS/Linux, follow the command-line installation instructions provided.
Step 2: Install Composer
- Run the Composer-Setup.exe file.
- During installation, specify the path to your PHP executable (e.g.,
C:\xampp\php\php.exe). - Complete the installation. Composer should now be globally accessible from your command line.
Step 3: Verify Installation
- Open a command prompt or terminal.
- Run
composer --versionto verify that Composer is installed correctly. You should see the installed version number.
6. Configure Composer with GitHub Token
When Composer needs to download packages from GitHub, especially when it hits rate limits or needs to access private repositories, it requires a GitHub token.
Step 1: Generate a GitHub Personal Access Token
- Log in to your GitHub account.
- Go to Developer Settings.
- Click on “Generate new token”.
- Give your token a descriptive name (e.g., Composer on MyLaptop), set an expiration date (e.g., 30 days), and select the necessary scopes (Since you’re accessing public repositories, you can leave all scopes unchecked).
- Click “Generate token” and copy the token. (Copy and save the token immediately as you won’t be able to see it again.)
Step 2: Configure Composer with the Token
- Open a command prompt or terminal.
- Run the following command to set the GitHub token globally:
Replace YOUR_GITHUB_TOKEN with the token you generated.
5. Enable the PHP Zip Extension
The PHP zip extension is necessary for Composer to handle zip archives, which are often used when downloading packages.
Step 1: Locate php.ini
- Find the
php.inifile used by XAMPP. It’s usually locatedC:\xampp\php\php.inion Windows.
Step 2: Enable the Zip Extension
- Open
php.iniin a text editor. - Search for the line
;extension=zip. - Remove the semicolon (
;) to uncomment and enable the extension:
- Save the changes.
Step 3: Restart Apache
- Go to the XAMPP Control Panel.
- Stop and start the Apache service to apply the changes.
6. Install Yii Application
With XAMPP, Composer, and the necessary configurations in place, you’re ready to install Yii2.
Step 1: Choose the Yii2 Template
Yii2 offers two templates:
- Basic Template: Suitable for simple applications.
- Advanced Template: Suitable for applications with multiple tiers (frontend, backend).
Step 2: Install the Basic Template
- Open a command prompt or terminal in the XAMPP
htdocsdirectory (e.g.,C:\xampp\htdocs). - Run the following command to install the Basic Template:
This command will create a new Yii2 application in a folder named basic.
Step 2 (Optional): Install the Advanced Template
- If you prefer the Advanced Template, run:
This command will create a new Yii2 application in a folder named advanced.
7. Verifying the Installation
Finally, run your Yii2 application and ensure everything is working correctly.
- If using the Basic Template, navigate to the project root directory:
You can use your browser to access the installed Yii application with http://localhost:8080/.
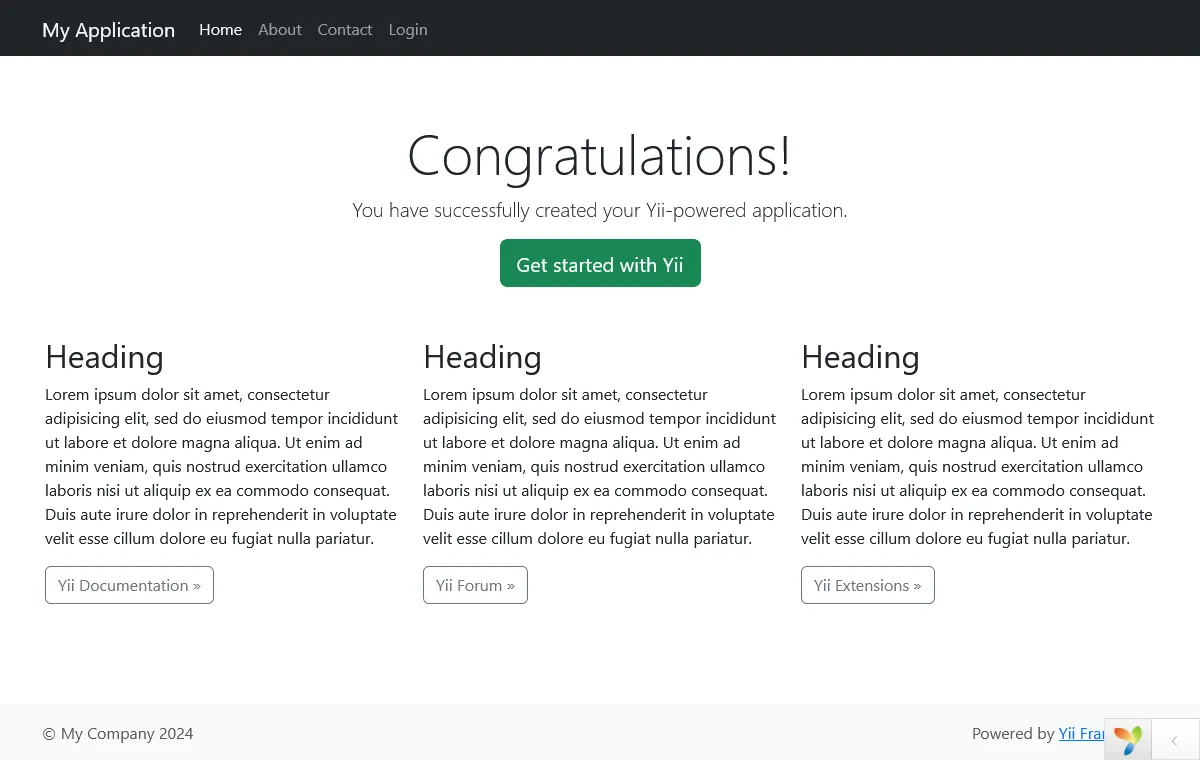
You should see the above “Congratulations!” page in your browser. If not, please check if your PHP installation satisfies Yii’s requirements.
8. Configuring Apache Web Server (Optional)
A Virtual Host allows you to host multiple websites on a single server. You can configure Apache to serve your Yii2 application from a specific domain or subdomain.
- Locate the Apache Configuration File:
- For XAMPP, the configuration file is usually located at
C:\xampp\apache\conf\extra\httpd-vhosts.conf. - Open
httpd-vhosts.confin a text editor.
- Create a New Virtual Host: Add the following configuration block to define a new virtual host for your Yii2 application:
- Replace "C:/xampp/htdocs/basic/web" with the path to your Yii2 application’s web directory.
- Replace myapp.local with your desired domain name.
- Edit the Hosts File: To map the domain name to your local machine, add an entry to your hosts file:
- On Windows, the hosts file is located at
C:\Windows\System32\drivers\etc\hosts. - Add the following line to the hosts file:
-
Restart Apache: Restart Apache from the XAMPP Control Panel to apply the changes.
-
Test the Configuration: Open a web browser and navigate to
http://myapp.local. You should see your Yii2 application’s welcome page.
🍃 This guide provided a comprehensive walkthrough of setting up your first Yii2 application, from installing XAMPP and configuring Composer to running your project on a web server. With Yii2, you gain access to a powerful and efficient framework that simplifies web development, enabling you to build scalable and secure applications with ease.
I appreciate you taking the time to read this article.🙌
Before you move on to explore the next article, don’t forget to give your claps 👏 for this article and share with your friends. Stay connected with me on social media. Thanks for your support and have a great rest of your day! 🎊
✍️ Vinojan Veerapathirathasan.