The Complete Guide to Building Progressive Web Apps with Next.js
Comprehensive guide to building high-performance Progressive Web Apps with Next.js, from setup to service workers and manifest configuration.
Hi there 👋,
Welcome to another project tutorial.
In today’s digital landscape, the choice of technology for developing web applications is pivotal to achieving both broad reach and robust performance. Among the various options, Progressive Web Applications (PWAs) have emerged as a compelling solution. This article delves into the world of PWAs using Next.js, a leading React framework that simplifies the creation of highly optimized web applications.
In this article, we’ll explore what PWAs are, their advantages and disadvantages, how they compare to native applications, and under what circumstances they are the best choice. Furthermore, we’ll discuss why Next.js is an excellent choice for building PWAs.
Progressive Web Application (PWA)
What is a Progressive Web Application?
A Progressive Web program is a specific kind of software that is created with popular web technologies like HTML, CSS, and JavaScript. It is designed to function on desktop and mobile devices alike, or any other platform that makes use of a standards-compliant browser. By utilizing the features offered by modern web browsers, PWAs are intended to deliver a ‘native-like’ experience while maintaining an excellent level of performance and user engagement.
Benefits of PWAs
The primary benefits of PWAs come from their hybrid design, which combines elements of native apps and conventional web pages.
- Offline Capability: PWAs can function offline or on low-quality networks thanks to service workers, which cache key resources.
- Installability: Users can add PWAs to their home screen and access them similarly to native apps.
- Re-engageable: Features like push notifications help in re-engaging users without the need for the app to be open.
- Safe: Served via HTTPS, PWAs ensure that all data transferred is secured.
- Discoverability: Being a part of the web, PWAs are inherently discoverable by search engines, which can be a significant advantage over native apps that require specific portals like app stores for discovery.
Pros and Cons of PWAs
While PWAs offer significant advantages, they also come with limitations:
Pros:
👉 Lower development and maintenance costs than native apps. 👉 No need for app store approvals, simplifying updates and distribution. 👉 Broad accessibility across devices and platforms.
Cons:
👉 Limited access to device and operating system features compared to native apps. 👉 Performance may still lag behind that of native apps, especially for complex animations and graphics. 👉 Inconsistent support across all web browsers and platforms.
PWA vs Native Apps
Choosing between a PWA and a native app largely depends on the specific needs of the project:
- Performance and Capabilities: Native apps generally offer superior performance and deeper integration with device hardware.
- Development Resources: PWAs can be more cost-effective and quicker to develop if the team is proficient in web technologies. PWAs are developed using web technologies (HTML, CSS, JavaScript), while native apps require platform-specific languages.
- Distribution: Native apps are typically distributed through app stores, while PWAs are accessed directly through web browsers.
- Installation: Native apps are installed on users’ devices, while PWAs can be installed as shortcuts on the device’s home screen.
When to Choose a PWA?
Opting for a PWA is ideal when the goal is to reach a broad audience without the constraints of app stores, and when the application’s requirements do not heavily rely on native-only features. They are particularly effective for applications aiming to enhance user engagement without the need for complex device functionalities.
Next.js
Next.js streamlines the development of complex applications by handling various aspects of performance optimization, scalability, and developer experience. Its allows for both static site generation (SSG) and server-side rendering (SSR), providing flexibility in choosing the appropriate rendering method for different parts of the application is particularly beneficial for PWAs, ensuring that they are not only fast and lightweight but also SEO-friendly.
By harnessing the capabilities of Next.js, developers can effectively address the modern demands of web applications, making it an ideal choice for those looking to build sophisticated, high-performance PWAs that stand out in the competitive digital ecosystem.
Why Choose Next.js for PWAs?
Next.js, built on top of React, offers a robust set of features that make it an excellent choice for developing PWAs:
- Performance: Next.js provides server-side rendering, code splitting, and other optimizations, resulting in faster loading times and improved performance.
- Server-side Rendering: Provides better SEO capabilities and faster page loads, enhancing the initial load experience.
- Built-in CSS Support: Simplifies styling with scoped CSS and supports various styling solutions out-of-the-box.
- API Routes: Allows building API endpoints within the Next.js app. This is useful for handling backend functionality without needing a separate server.
Let’s start to build the a real progressive web application with Next.js 👩💻
Setting Up Your Development Environment
To build a PWA with Next.js, you need to have the right development environment in place. Here are the steps to get started:
1. Install Node
Make sure to have the Node.js on your computer. If you don’t have it, You can download it from their official website and install it.
2. Create a New Next.js project
Use the Next.js CLI to create a new project. Run this command:
In this project, I am going to use the _TypeScript_. So make sure to select _yes_ to Typescript, ESLint, Tailwindcss, App router.
3. Navigate to the Project Directory
4. Install next-pwa
To create PWA in Next.js you need to install a package called next-pwa
The next-pwa package provides a number of features that make it easy to create PWAs, including:
- Service worker generation and registration
- Caching
- Offline support
- Manifest file generation
- Head meta tags
5. Next Configuration for PWA
Add the following configuration to your next.config.mjs to enable next-pwa.
This code sets up the Next.js application with PWA capabilities using the next-pwa package. It configures various options related to React Strict Mode, minification, service worker behavior, and PWA registration based on the best practices of development environment.
Create the .env file and define the NODE_ENV as development.
And Update the .gitignore file with this new code.
6. Add Manifest File
For PWA you need to add a manifest.json file on the public directory. To generate the JSON code, go to Web App Manifest Generator and fill up your app details. It will give you the manifest.json file content, just copy and paste them into your file.
The Manifest file content will look like this:
7. Define the PWA Metadata
Modify the metadata on your layout.ts file in the app directory.
Note: Make sure to added all icons to
public/iconsas you mentioned onmanifest.jsonandlayout.ts.
8. Build and Run PWA
Once you have finished configuring your code for next-pwa, we can move to test the application. To test the Progressive Web App (PWA) locally, Let’s build your next application by using this command:
After the build, you can see two files created in your public folder:
- sw.js: This file is a Service Worker file. Service Workers are utilized for various purposes such as caching, background synchronization, providing native features, and enabling offline support.
- workbox-07a7b4f2.js: This file, named workbox, is used to facilitate asset caching. It helps improve the performance of your web application by storing frequently used assets locally to reduce the need for repeated downloads.
Now, Run the application locally.
Navigate to http://localhost:3000 on your browser (Google chrome). You can see thee installable icon located in the right side of the URL bar.
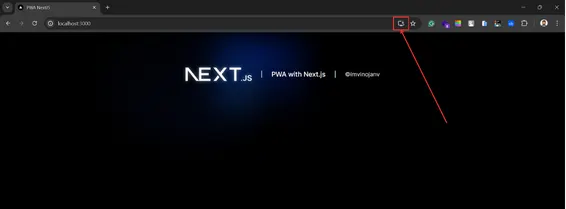
You can simply click the icon and install it on your computer (Any OS). It will work like a native application. (It will also available on your apps collection). you can search and launch the app on your computer as like other apps.
Conclusion
As we’ve explored throughout this guide, Progressive Web Applications represent a transformative approach in the development of modern web applications. By choosing Next.js for your PWA development, you leverage an advanced framework designed to enhance performance, maintainability, and user experience. With features like server-side rendering, static site generation, and efficient code splitting, Next.js not only simplifies the development process but also ensures your app performs excellently on any platform.
Remember, the key to a successful PWA is not just about the technologies used; it’s about creating a seamless, user-centric experience that feels native and performs excellently across all devices. As you embark on your journey to build a PWA with Next.js, keep these principles in mind to ensure your application is accessible, engaging, and above all, effective.
I appreciate you taking the time to read this article.🙌
GitHub Repo: https://github.com/imvinojanv/pwa-nextjs
Before you move on to explore the next article, don’t forget to give your claps 👏 for this article and share with your friends. Stay connected with me on social media. Thanks for your support and have a great rest of your day! 🎊
✍️ Vinojan Veerapathirathasan.